From Zero to Code Hero: A Newbie's Guide to Web Development Setup
Welcome to this comprehensive guide crafted specifically for coding newbies!
Here, I'll walk you through setting up a development environment on macOS to kickstart your journey with CodebaseUp - your express lane to web development success.
Whether you're using CodebaseUp Free with its limited features or unlocking the full potential with CodebaseUp Pro, this guide has got you covered.
Powered by the versatility of JavaScript and TypeScript, CodebaseUp has your back, offering a streamlined codebase that wipes away setup hassles. It empowers you to transform your creative ideas into production-ready applications within minutes.
Whether you're flying solo or part of a team, CodebaseUp simplifies the path to innovation. It covers major use cases and integrates development best practices to ensure a stable and efficient codebase.
Contrary to popular no-code tools, CodebaseUp invites you to a low-code journey, granting you the freedom to build anything you envision while sidestepping the limitations often found in popular no-code tools.
By following these steps, you'll effortlessly overcome the initial coding barrier, allowing you to dive into building your dream projects with confidence.
Let's embark on this coding adventure together!
1. Getting Started with the Terminal
The terminal is like a secret passage to the heart of your Mac's brain. It's a place where you communicate with your computer using simple text commands. Getting cozy with the terminal is a vital step in getting comfy with the whole coding thing.
1.1 Introduction to the Terminal
The terminal might seem intimidating at first, but it's a powerful tool that provides direct access to your computer's file system and allows you to execute commands efficiently.
Don't worry; you'll soon find that using the terminal is an essential skill for any coder.
1.2 Launching the Terminal
To open the Terminal on your Mac, you can use Spotlight Search. Press Cmd + Space to open Spotlight, then type "Terminal" and hit Enter.
Alternatively, you can find it in the Applications > Utilities folder.
1.3 Installing Homebrew
Now, let's bring in Homebrew - your coding genie for installing and managing software on your Mac. To install Homebrew, paste the following command into your Terminal and press Enter:
/bin/bash -c "$(curl -fsSL https://raw.githubusercontent.com/Homebrew/install/HEAD/install.sh)"Just follow the on-screen instructions; you might need to sprinkle some password magic during the installation. It's like giving your computer a magic wand for installing cool stuff!
Resources: https://brew.sh/
1.4 Installing Git
Version control is like a superpower for developers, and Git is the tool that grants you this power.
It allows you to track changes in your codebase over time, collaborate with others seamlessly, and, most importantly, undo mistakes easily.
Imagine you're working on a document, and you want to make some changes. You start editing, but then realize you've made a significant error. Without version control, you might have to manually save multiple copies of the document, like "Document_V1," "Document_V2," and so on.
This quickly becomes messy and confusing.
Now, picture Git as an advanced version of this.
Instead of creating manual copies, Git automatically tracks every change you make. It's like having a magic wand that allows you to revisit any point in the document's history. If something goes wrong or if you want to see how the document looked a week ago, you can do it in a snap.
It's like having an unlimited undo button for your code.
While I heavily use Git as a solo maker (and you should too), Git is particularly crucial when working on a project with others. It helps avoid conflicts when multiple people are making changes simultaneously.
Each person can work on their part independently, and Git intelligently merges the changes when necessary.
To install Git using Homebrew, run the following command in the Terminal:
brew install gitHere are some of the most commonly used Git commands that form the core set of tools for day-to-day Git usage.
git init Initializes a new Git repository. Run this command in the root directory of your project to start version control.
git clone <repository_url> Creates a copy of a remote repository on your local machine. Use this command with the URL of the repository you want to clone.
git add <file> Adds changes in a specific file to the staging area,
preparing them to be committed. You can also use git add . to add all changes.
git commit -m "Your commit message" Records changes to the repository with a descriptive commit message. The -m flag allows you to add the message directly in the command.
git status Shows the status of changes as untracked, modified, or staged. Useful for understanding what changes are ready for a commit.
git pull Fetches changes from a remote repository and merges them into the current branch. Helpful to sync your local repository with the remote.
git push Pushes your committed changes to a remote repository. Use this to share your work with others or to update a shared repository.
git branch Lists all local branches in your repository. The current branch is highlighted with an asterisk.
git checkout <branch> Switches to the specified branch. Useful for moving between different branches in your repository.
git merge <branch> Combines changes from the specified branch into the current branch. It helps integrate changes made in different branches.
git log Displays a log of all commits in reverse chronological order. It provides a detailed history of changes made in the repository.
With Git on your side, you're equipped to handle solo projects or team collaborations. It's your coding time-travel companion!
Resources:
https://www.atlassian.com/git/tutorials
1.5 Installing Node.js
Now, let's bring in a tool called Node.js.
Think of Node.js as a friendly assistant that helps your computer understand and run JavaScript outside of a web browser.
It's an essential tool for many web development tasks.
Node.js has different versions, and each version may introduce new features, improvements, or changes. Projects might specify a particular Node.js version to ensure compatibility.
For example, CodebaseUp may work optimally with version 18.17.0. It's crucial to use the right version for your project to avoid potential compatibility issues and leverage the latest enhancements.
To install Node.js with version management using a tool called nvm (Node
Version Manager), follow these steps:
First, let's install nvm. Open your Terminal and run this command:
curl -o- https://raw.githubusercontent.com/nvm-sh/nvm/v0.39.7/install.sh | bashClose and reopen your Terminal or run the following to apply the changes:
source ~/.bashrcNow, you can install a specific version of Node.js. For example, if you need version 18.17.0 (that powers CodebaseUp), run:
nvm install 18.17.0To use the installed version, set it as the default:
nvm use 18.17.0Note: If you ever need to work on a project with a different Node.js version, you can easily switch. Just navigate to your project's directory and create a file named .nvmrc. Inside this file, write the version number (e.g., 20.10.0). The next time you enter the project directory, nvm will automatically switch to the specified version. Great job! This method allows you to manage Node.js versions effortlessly based on your project's requirements.
Great job! You've just added a powerful ally to your coding arsenal. Onward to more coding wonders!
Resources:
https://github.com/nvm-sh/nvm#installing-and-updating
1.6 Installing pnpm
When you install Node.js, it comes bundled with npm, which stands for Node
Package Manager.
npm allows you to easily install and manage libraries (also known as packages
or modules) created by other developers. These libraries can add functionality
to your projects without you having to reinvent the wheel.
For example, if you need a date formatting tool or a powerful image processing
library, you can find and install them using npm with simple commands like
npm install <package-name>. This way, you can leverage the work of the
broader developer community to enhance your own projects. Developers often refer
to these packages as project dependencies.
Now, let's talk abou pnpm - a more nimble alternative to npm. While npm is
the go-to package manager, CodebaseUp prefers the swifter performance of pnpm.
Think of it as a speedier version of npm with a knack for efficient
installations.
CodebaseUp has a specific requirement for the version of pnpm it works best
with. To ensure compatibility, run this command:
npm install -g pnpm@<desired_version>This command installs the preferred version of pnpm globally on your machine.
Once installed, you can use pnpm just like npm. For example, to install
dependencies for a project, you can use pnpm install (more about this later).
Resources:
2. Setting Up Visual Studio Code
Visual Studio Code (VS Code) is a powerful and user-friendly code editor that will be your companion throughout your coding journey. It comes equipped with features that enhance your productivity and make coding a breeze.
Resources:
2.1 Introduction to Visual Studio Code
Visual Studio Code is like your digital workspace, providing a comfortable environment to write, edit, and manage your code. It's designed to be intuitive for both beginners and experienced developers. Let's set it up to work seamlessly with CodebaseUp.
2.2 Installing Visual Studio Code
- Visit the VS Code website - https://code.visualstudio.com
- Click on the "Download Mac Universal" button.
- Once the download is complete, open the downloaded file.
- Drag the VS Code icon to the Applications folder to install it.
2.3 Installing Recommended Extensions
Extensions are like plugins that enhance the functionality of VS Code. Install the recommended extensions to make your coding experience with CodebaseUp even better.
Open VS Code.
Go to the Extensions view by clicking on the Extensions icon in the Activity Bar on the side of the window or press Cmd + Shift + X.

Search for and install the following recommended extensions:
ESLint:
ESLint is a tool that helps you find and fix problems in your JavaScript code. It ensures your code follows coding standards and catches common errors, making your code more reliable and maintainable.
Prettier - Code formatter:
Prettier is like an automated code stylist. It helps you maintain consistent code formatting across your project, automatically fixing indentation, line breaks, and other style-related issues. This ensures a clean and uniform appearance for your code.
Prisma:
Prisma is a database toolkit for Node.js and TypeScript. It simplifies database interactions by providing a type-safe and auto-completing query builder. With Prisma, you can interact with databases more intuitively, reducing the chances of errors in your data queries.
Tailwind CSS IntelliSense:
Tailwind CSS is a utility-first CSS framework, and this extension provides intelligent autocompletion for Tailwind CSS classes in your HTML, CSS, and JavaScript files. It speeds up your development process by helping you remember and use Tailwind CSS classes more efficiently.
DotENV:
It provides syntax highlighting and autocompletion for environment variable files (more to this topic later).
When the extensions are installed, restart VS Code to apply the changes.
You've successfully set up Visual Studio Code, your coding hub for building projects with CodebaseUp.In the next chapter, we'll explore the world of GitHub, helping you manage your code efficiently.
3. GitHub Basics: Getting Started with Version Control in the Cloud
GitHub is where your Git repositories come to life on the web. It's a platform that allows you to store, manage, and collaborate on your projects, providing a central hub for your code.
In this chapter, we'll cover the basics of GitHub, how it relates to Git, and how to set up your account and first repository.
3.1 Understanding Git vs. GitHub
Git is a distributed version control system that allows you to track changes in your code and collaborate with others. It works locally on your machine.
GitHub is a web-based platform built around Git. It provides a centralized space for hosting and managing your Git repositories. GitHub facilitates collaboration, allowing multiple developers to work on the same project and track changes in a shared environment.
3.2 Creating Your First Repository
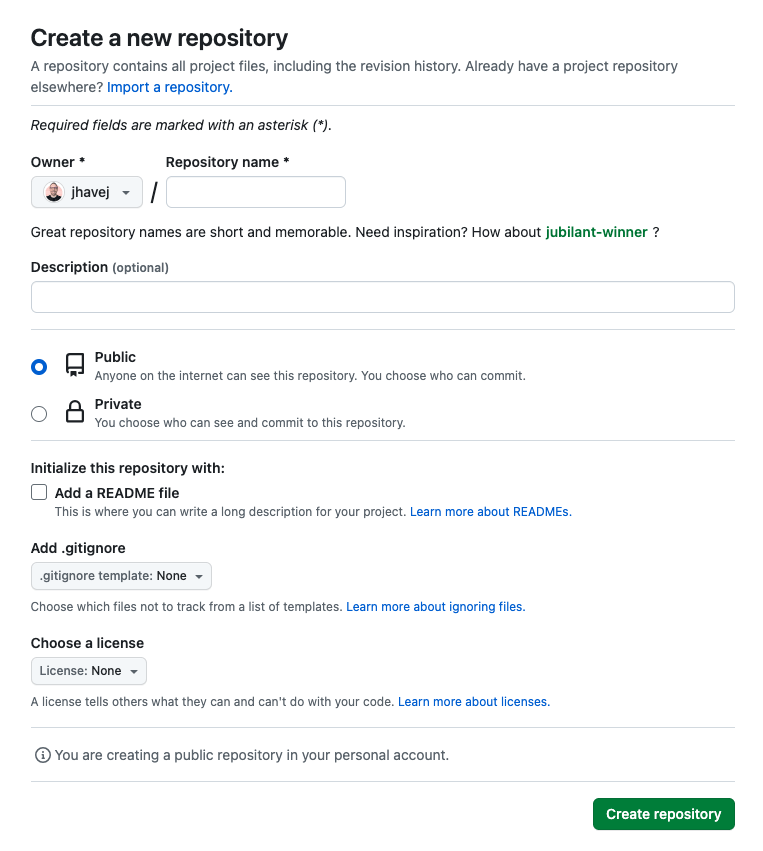
Open your web browser, go to GitHub - https://github.com - and create an account.
A repository, or "repo" for short, is where your project lives on GitHub. Let's create your first repository.
- Log in to your GitHub account.
- On the GitHub homepage, click the "+" sign in the top right corner and select "New repository."
- Give your repository a name, like "MyFirstRepo."
- Optionally, add a description for your repository.
- Choose between public (visible to everyone) and private (visible only to you and collaborators) repository settings.
- You can initialize this repository with a README file. While it's a good practice to include a README file when starting a new project, you won't need it when launching based on CodebaseUp shortly as it contains it own README file.
- Click "Create repository."
Congratulations! You've just created your first GitHub repository.
In the next chapter, we'll explore how to connect your local development environment with GitHub, allowing you to push and pull code changes between your machine and the cloud.
Resources:
https://docs.github.com/en/get-started/quickstart/creating-an-account-on-github
4. Cloning CodebaseUp and Linking to Your Repository
In this step, we'll explore how to leverage CodebaseUp as the foundation for your own project.
CodebaseUp is stored in an existing GitHub repository, which is maintained by me.
4.1 Creating and Navigating to the Desired Location
Before we start, let's ensure you're in a location of your choice on your computer. If you'd like to create a new directory, here's how:
Open the terminal on your computer.
Type the following command to create a new directory named "Projects" in your home folder:
mkdir ~/ProjectsThis command stands for "make directory" (mkdir) and creates a folder named "Projects". The tilde (~) represents the home directory of the user.
Now, navigate to the newly created directory using the following command:
cd ~/ProjectsThis command tells your computer to change the directory (cd) to the "Projects" directory within your home folder.
4.2 Cloning CodebaseUp
Now that you're in the right place, let's bring CodebaseUp to your local environment:
Type the following command to clone CodebaseUp to your machine, replacing "YOUR-PROJECT-NAME" with the name you want for your project:
git clone https://github.com/jhavej/codebaseup YOUR-PROJECT-NAMEPress Enter and watch as your terminal fetches CodebaseUp to your current location within the "Projects" directory.
Resources:
https://github.com/jhavej/codebaseup
4.3 Changing the Remote Origin: Why and How
When you clone a repository, Git automatically sets up a remote connection known as the "origin."
Initially, this points to the repository from which you cloned (in this case, CodebaseUp).
However, since you're building your unique project, you'll want to redirect the "origin" to your own GitHub repository that you created in one of the previous steps.
Let's understand why and how to make this crucial change.
Why Change the Remote Origin:
Ownership: By redirecting the remote origin, you assert ownership of your project on GitHub. Pushing changes to CodebaseUp's repository wouldn't make sense - you want your updates to reflect in your repository.
Collaboration: If you intend to collaborate with others or deploy your project online, having a repository under your GitHub account is essential.
How to Change the Remote Origin:
-
Navigate to Your Project:
cd YOUR-PROJECT-NAME -
Check Current Remotes:
git remote -vThis command shows the current remote connections. Initially, you'll see something like:
origin https://github.com/jhavej/codebaseup.git (fetch)
origin https://github.com/jhavej/codebaseup.git (push)
This indicates that "origin" points to CodebaseUp.
-
Change Remote Origin:
git remote set-url origin git@github.com:YOUR-USERNAME/YOUR-REPOSITORY.gitReplace "YOUR-USERNAME" with your GitHub username and "YOUR-REPOSITORY" with the name of the GitHub repository you created.
-
Verify Changes:
git remote -v
After changing the remote origin, you should see:
    origin git@github.com:YOUR-USERNAME/YOUR-REPOSITORY.git (fetch)
    origin git@github.com:YOUR-USERNAME/YOUR-REPOSITORY.git (push)
Now, "origin" points to your GitHub repository.
Congratulations! You've successfully redirected the remote origin to your GitHub repository.
This ensures that your changes are tracked and stored in your project's repository. You're now ready to make changes, committing them, and syncing with GitHub. Keep coding!
Resources:
5. Opening Your Project in VS Code and Adding Environment Variables
Now that you have CodebaseUp cloned and linked to your own repository, let's open it in VS Code, configure some essential environment variables, and understand the project structure.
5.1 Opening Your Project in VS Code
Visual Studio Code is where the magic happens. Let's open your project and explore the code:
- Open VS Code on your computer.
- Click on "File" in the top-left corner.
- Select "Open folder..." from the dropdown menu.
- Navigate to the location of your CodebaseUp project (e.g. ~/Code/YOUR-PROJECT-NAME) and click "Open."
VS Code will now load your project, and you'll see the project structure on the left side.
5.2 Project Structure: Codebase Modularity with Monorepo
The CodebaseUp project adopts a so-called monorepo project structure, designed for both solo makers and tech teams.
This structure emphasizes code modularity, allowing you to create reusable components and packages.
For example, consider a scenario where you want to develop a reusable design system package applicable to multiple apps (e.g., web, documentation, or a browser extension).
This approach ensures that you avoid writing repetitive code and promotes efficiency.
Resources:
Apps and Packages:
There are two main folders in the root of the codebase:
apps folder:
Understand apps as a standalone and independent web application. It can be your main website with landing pages, browser extensions, or blogs. Each can be deployed online independently on its own domain (e.g. yourdomain.com) or subdomain (blog.yourdomain.com).
Th apps/web folder houses a Next.js app, serving as the primary app used for
demo purposes that we will spin up shortly.
While the codebase provides the Next.js app as a starting point, you can use
other React-based frameworks and still benefit from the codebase. Consider the
web app as a guide when creating your own apps.
packages folder:
The packages folder contains a collection of reusable and ready-to-use packages that are employed throughout the monorepo.
They are either JavaScript/TypeScript libraries (e.g., database, emailing, or payments) or React components (e.g. ui).
- database: powered by Prisma, the Node.js and Typescript ORM.
- emailing: powered by react email and Sendgrid.
- eslint-config-custom: ESLint configurations.
- tailwind-config: Tailwind CSS configurations.
- tsconfig: Typescript configurations.
- ui: Beautifully designed components by shadcn/ui. Based on Radix & Tailwind CSS & Lucide Icons. Fully customizable.
Understanding this project structure enables you to leverage the benefits of code modularity and efficiently build your applications.
In the next steps, we'll configure environment variables and explore how to run your project locally.
Keep coding!
Resources:
5.3 Setting Up Environment Variables
Environment variables are like secret codes that your project uses to adapt to different situations.
It's important to note that setting up environment variables is optional in CodebaseUp.
While these variables enable the built-in modules for features like authentication, database access, analytics, payments, and more, the core functionality of the application remains fully functional even if they are left empty.
This means you can still build landing pages, write blog posts, and leverage the fundamental capabilities of CodebaseUp without configuring these optional variables.
Once you get familiar with the codebase, you can tailor your project according to your immediate needs and gradually incorporate additional configurations as your project evolves.
Now let's dive into setting them up in VS Code.
- In the root of the project, create a new file named
.env.local. - Also in the root of the project, you'll find a file named
.env.local.example. It contains a list of example environment variables with empty values. - Copy the content of this file.
- Open
.env.localand paste the copied content. - Replace the placeholder values with your actual configuration (only where needed according to your project needs, the remaining values can remain empty).
You've successfully opened your CodebaseUp project in VS Code and added essential environment variables.
In the next steps, we'll explore how to run your project locally and see it come to life.
Keep coding!
6. Installing Project Dependencies
Before we jump into the coding extravaganza, let's talk about project dependencies.
These are like the building blocks that make your project work seamlessly. Think of them as tools and resources your project needs to bring your ideas to life.
In our CodebaseUp monorepo world, our project is like a city with a big master plan, and every app and package is a unique building.
To manage this, we have special files called package.json in the city's main
blueprint (the root) and in each building.
Root package.json: This file at the project's heart lists things that everyone
in the city needs, like utilities shared across buildings.
Building package.json: Each building has its own package.json that lists
what's specific to that place—like unique furniture or tools.
Now, let's talk about dependencies. These are like tools or resources your city
and its buildings need. When you run pnpm install in the main city center
(root), it's like ordering supplies for the entire project. It checks the main
blueprint and gets what's needed for everyone.
But, if you're focusing on a specific building, you go to that building's
location in the city and run pnpm install. This gets only the supplies needed
for that building.
In your terminal, if you're in the city center (root), just say:
pnpm installAnd that's it! Your city is equipped, and each building has what it needs to shine.
On to the next chapter of your coding adventure!
7. Spinning Up the Development Server:
Now that your CodebaseUp project is configured, environment variables are optionally set, and project dependencies are installed, it's time to bring your application to life by spinning up the development server.
7.1 Launching the Whole Monorepo
To run all the apps and packages included in the monorepo, use the following command in the Terminal:
pnpm run devThis command initiates what's called a "development server" right on your local machine. Think of it as a mini, private corner of the internet hosted on your computer where your CodebaseUp project can run and evolve.
It also comes with a cool feature called "hot reload." Imagine every time you make changes to your code, those changes are immediately reflected in your browser without needing to refresh the page.
It's like having a live connection between your code editor and your application!
7.2 Running a Specific App or Package
If you want to conserve computer resources (recommended) or focus on a specific
app or package within the monorepo, use the --filter option.
For example, to run only the web app:
pnpm run dev --filter=webThis command launches the development server exclusively for the specified app or package.
7.3 Accessing the App
Once the development server is up and running, you can access your application in a web browser:
Open your preferred web browser.
Go to http://localhost:3000.
This way you're essentially telling your browser to connect to a specific
location on your computer. Let's break down what http://localhost:3000 means:
http://: This stands for Hypertext Transfer Protocol, which is the foundation
of any data exchange on the web. It defines how messages are formatted and
transmitted.
localhost: It refers to the current machine or the computer you are using. In
simpler terms, it's like saying "this computer" or "my computer."
:3000: This part specifies the port number. A port is like a door through
which information can flow in and out of a computer. The number 3000 is just a
label for a specific door. In our case, it's the door where your CodebaseUp
application is waiting to communicate.
So, when you go to http://localhost:3000 in your browser, it's akin to opening
a door on your computer (port 3000) and peeking inside to see your running
application.
It's a way for your browser to find and interact with the application's server, all happening locally on your machine.
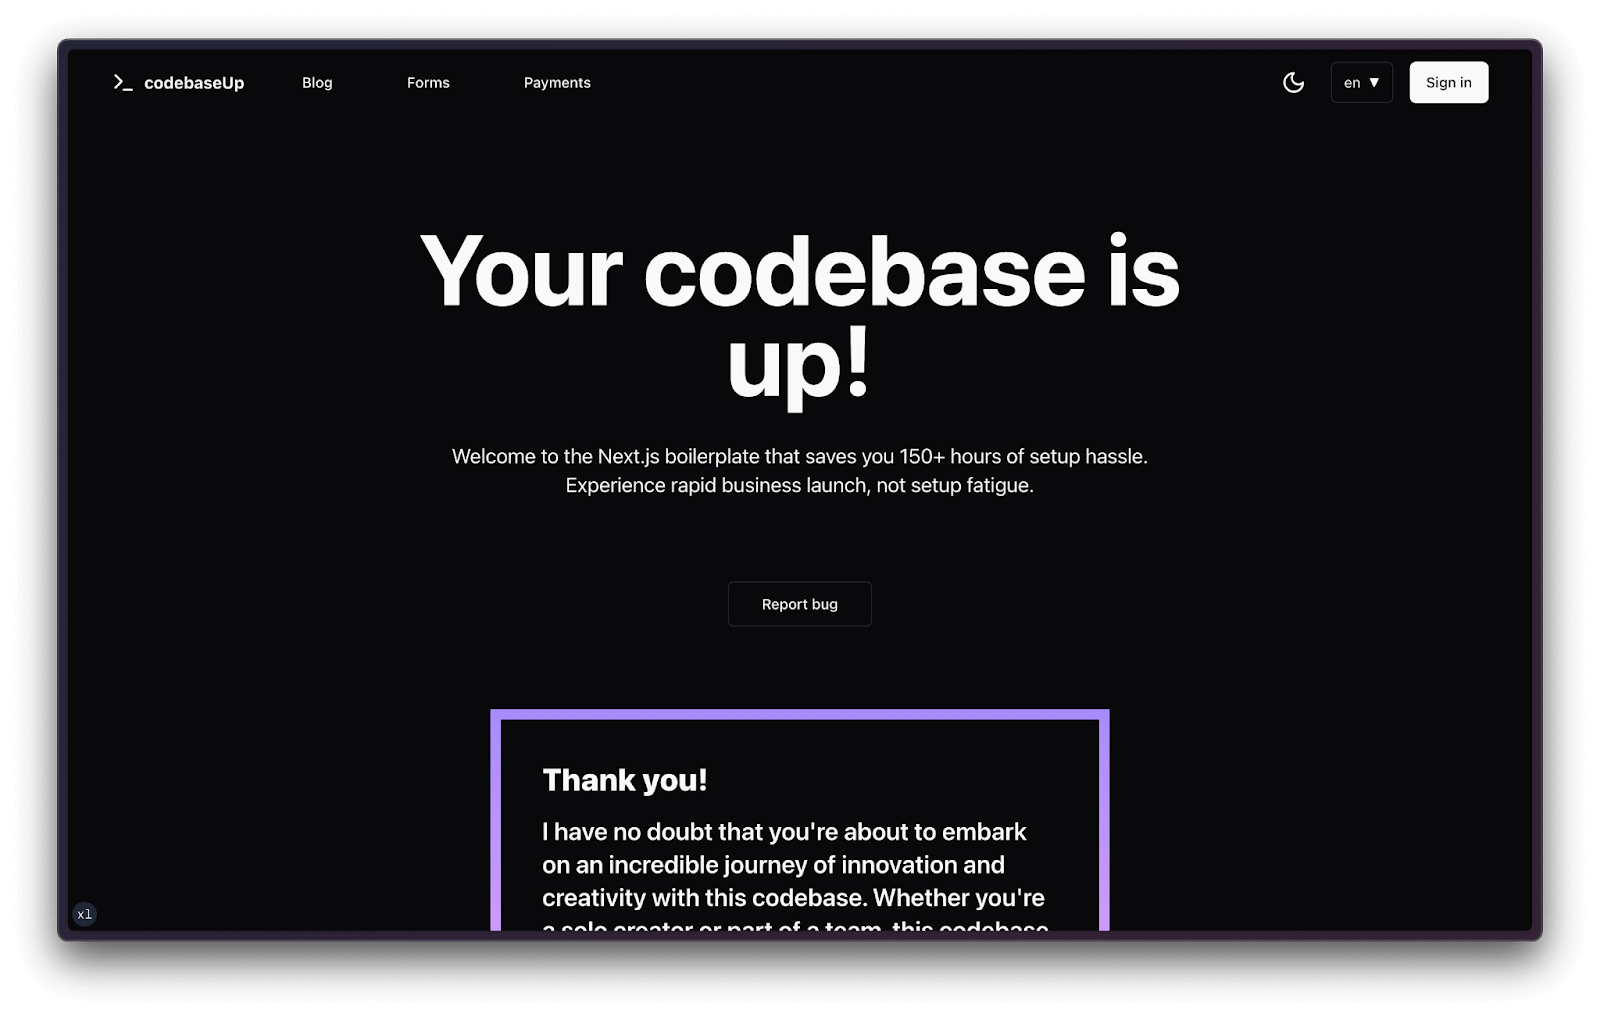
Voilà! Your CodebaseUp application is now alive and kicking right on your local machine.
This means you can see and interact with the app without it being on the internet. It's like having a playground for your code, all within the comfort of your computer.
7.4 Additional Perks
Logs in the Terminal:
Keep an eye on the terminal where you launched the development server.
It's like the command center for your application, and you'll see logs indicating what's happening behind the scenes.
Don't worry if some of it looks like a secret code; those logs are there to help you understand what your app is doing and the better developer you become the more sense it starts to make.

Chrome DevTools:
Ever heard of detective work for code?
Open up the Chrome browser and right-click on your running CodebaseUp app.
Select "Inspect" or use the shortcut Cmd + Option + I. Here, you'll find the Chrome DevTools - another powerful tool to see logs, inspect elements, and explore the runtime details of your application. It's like having X-ray vision for your code!
Congratulations! You've successfully spun up the development server for your CodebaseUp project. Whether you're running the entire monorepo or a specific app, this step brings your project to life locally. In the upcoming chapters, we'll delve into exploring and customizing your application. Enjoy the journey of building with CodebaseUp!
8. Making Changes to the Code
Now that your CodebaseUp application is up and running, let's make some personalized changes to the code.
We'll start with a simple tweak to the hero heading on the main landing page.
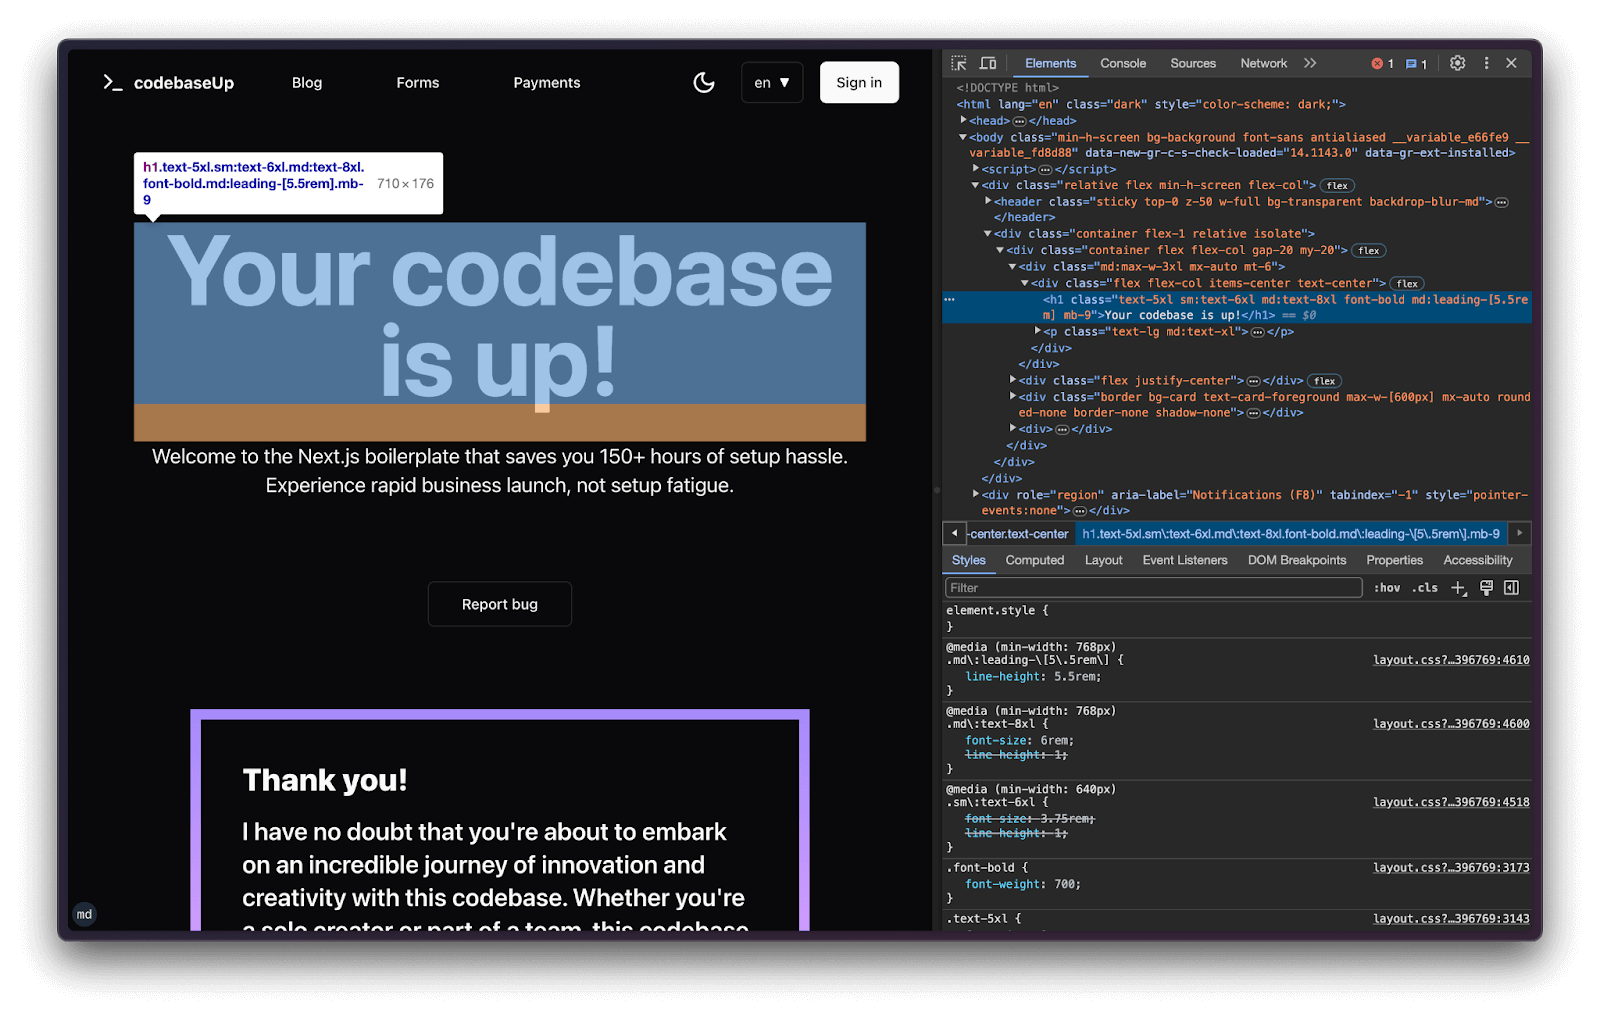
8.1 Changing the Hero Heading
- Open Visual Studio Code (VS Code).
- Press Cmd + P to access the file search bar.
- Type
Homepage.tsxand press Enter. - You'll navigate to the
Homepage.tsxfile within the web app.
-
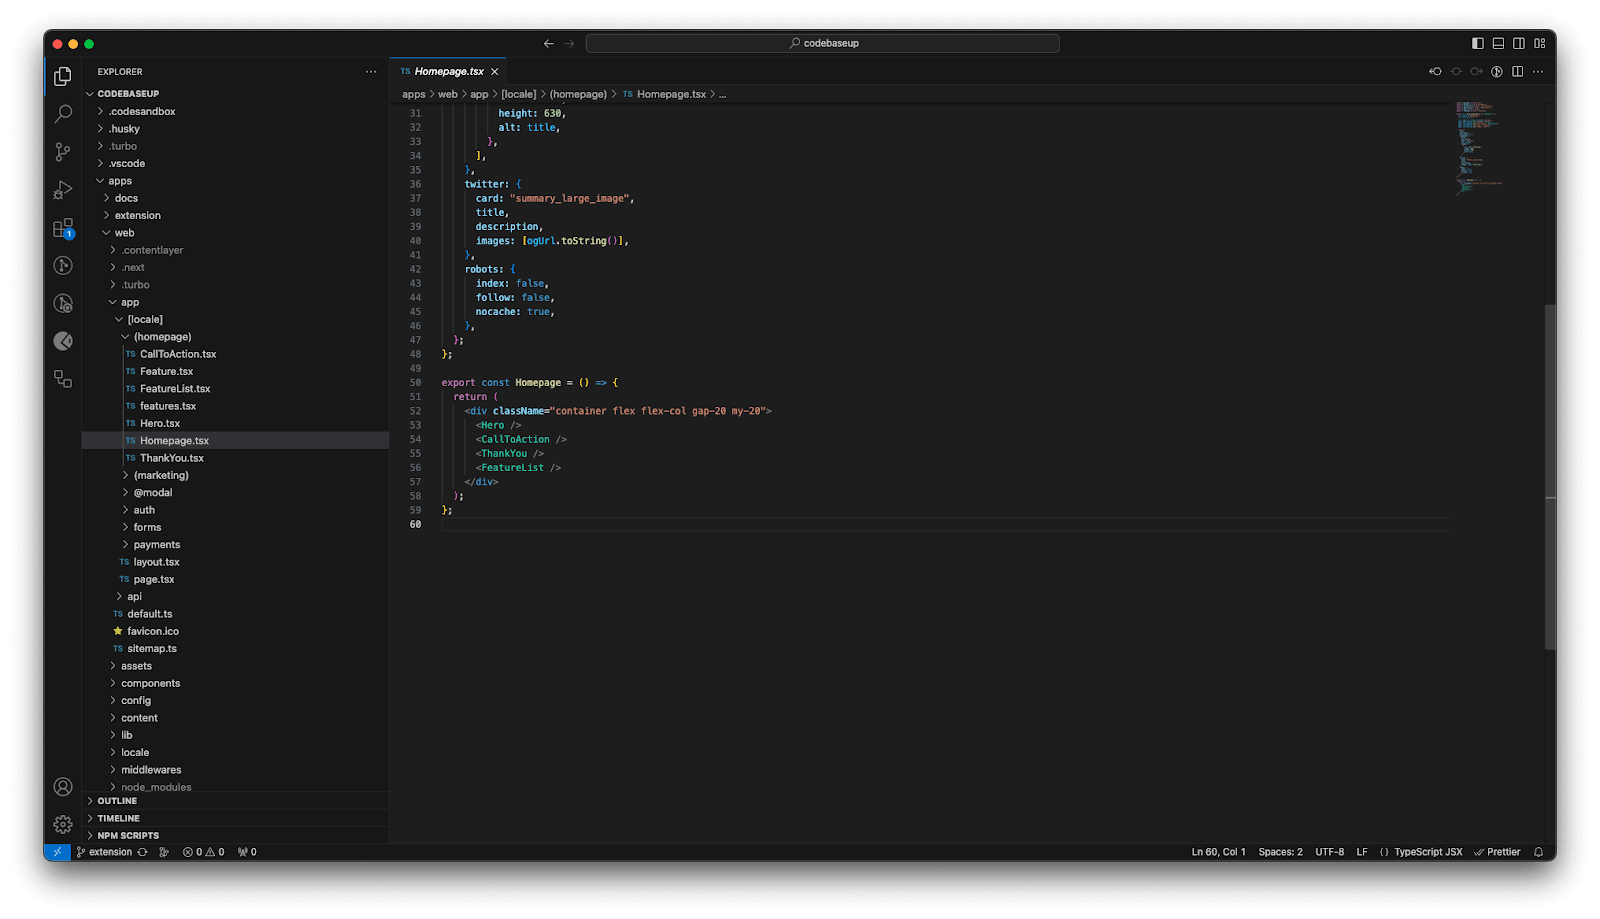
Locate the following code snippet representing the Homepage component:
export const Homepage = () => {
  return (
    <div className="container flex flex-col gap-20 my-20">
      <Hero />
      <CallToAction />
      <ThankYou />
      <FeatureList />
    </div>
  );
};
This JavaScript function is a React component containing four sub-components: Hero, CallToAction, ThankYou, and FeatureList.
-
Now, let's focus on the Hero component. While holding Cmd, click on <Hero /> to navigate to the Hero React component.
-
Within the Hero component, find the row containing
{t("heading")}. This line involves a translation functiontwith the argument"heading". The functiontis defined above as constt = useTranslations("Homepage"), indicating text translations. -
To change the text, press Cmd + P again, type en.json, and press Enter. This action directs you to the file containing English translations. Look up
"Homepage"and"heading", then change the text from"Your codebase is up!"to"I know how to code!". Either wait a few seconds or press Cmd + S to save the file. -
Head to your browser to witness the change in action.
By following these steps, you've successfully customized the hero heading in your CodebaseUp application.
This process demonstrates how to navigate through your code, locate specific components, and make targeted changes.
8.2 Creating a New Git Branch
Now that we've made our initial changes to the CodebaseUp application, let's take a moment to set up a new Git branch.
In the context of Git, a branch is like an isolated workspace within our project. It allows us to make changes, test ideas, or fix issues without directly affecting the main branch (on GitHub really named “main”).
This is a best practice, ensuring that our modifications are contained and won't immediately impact the stable version of our application.
- Head to the Terminal. If you're not already in the project's Git folder, navigate to it using the cd command. For example:
cd ~/Code/YOUR-PROJECT-NAME
- In the terminal, type the following command to create a new branch:
git checkout -b your-branch-nameReplace your-branch-name with a descriptive name for your branch, such as
update-hero-heading.
- Press Enter to create the new branch. Now you've switched to the newly created branch.
8.3 Making Your First Git Commit
Now that we've set up a new branch and made changes to your project, let's commit these changes using Git.
A commit is like taking a snapshot of your code at a specific point in time. It helps you keep track of the evolution of your project.
- In the Terminal, ensure you're still in your project's Git folder:
cd ~/Code/YOUR-PROJECT-NAME
- Type the following commands to stage and commit your changes:
git add .
git commit -m "Update hero heading text"
The first command stages the changes, and the second commits them with a descriptive message.
- Now, it's time to push your changes to the branch on GitHub:
git push origin your-branch-nameReplace your-branch-name with the name you gave to your branch (e.g. update-hero-heading from the previous step).
- Head over to your GitHub repository in a web browser. You should see a prompt to compare and pull request your branch.
- Click on "Compare & pull request."
- Review your changes and, if everything looks good, click on "Create pull request."
- Give your pull request a meaningful title and description.
- Click on "Create pull request" one more time.
You've successfully made your first Git commit, pushed changes to a new branch, and initiated a pull request on GitHub.
This is a crucial part of collaborative coding and version control, allowing you to contribute your modifications to the main project seamlessly.
Conclusion: Celebrate Your Coding Milestone!
Congratulations! You've completed this comprehensive guide, navigating through the initial steps of setting up your development environment, exploring CodebaseUp, and making your first Git commit. 🎉
In this journey, you've:
Mastered the Terminal: Overcome the initial apprehension of the command line, gaining a powerful tool for interacting with your computer's file system.
Embraced Git and Version Control: Understand the significance of version control, making your coding journey smoother and collaborative.
Installed Node.js and pnpm: Equipped your machine with essential tools for running JavaScript outside the browser and efficiently managing packages.
Set Up Visual Studio Code: Established a digital workspace that streamlines code writing, editing, and management.
Cloned CodebaseUp and Customized Your Project: Transformed CodebaseUp into your unique project, changing the hero heading and navigating through the codebase confidently.
Made Your First Git Commit: Commited your changes, pushed them to GitHub, and initiated a pull request—a key step in collaborative coding.
Now, take a moment to reflect on what you've achieved. You've laid the foundation for your coding adventure, embracing the tools and practices that will empower you to bring your ideas to life. Remember, every coder started somewhere, and you've just taken significant strides forward.
As you continue this journey, explore more, build upon what you've learned, and never hesitate to dive into the exciting world of coding. Your possibilities are endless, and you've just unlocked the door to a realm of creativity and innovation.
Happy coding, and may your projects flourish! 🚀